Rebecca Mezoff Blog — Rebecca Mezoff

To find your online classes on Pathwright, click HERE.

Weft tension: how to control the amount of weft used in tapestry weaving

The Latest Catastrophe

I often get questions from students similar to the one I found in my inbox this morning. I thought some of you might be interested in the solution to this common problem.

The student started the email with, "Hi Rebecca, Here is my latest catastrophe. I am so discouraged."

She went on to say:
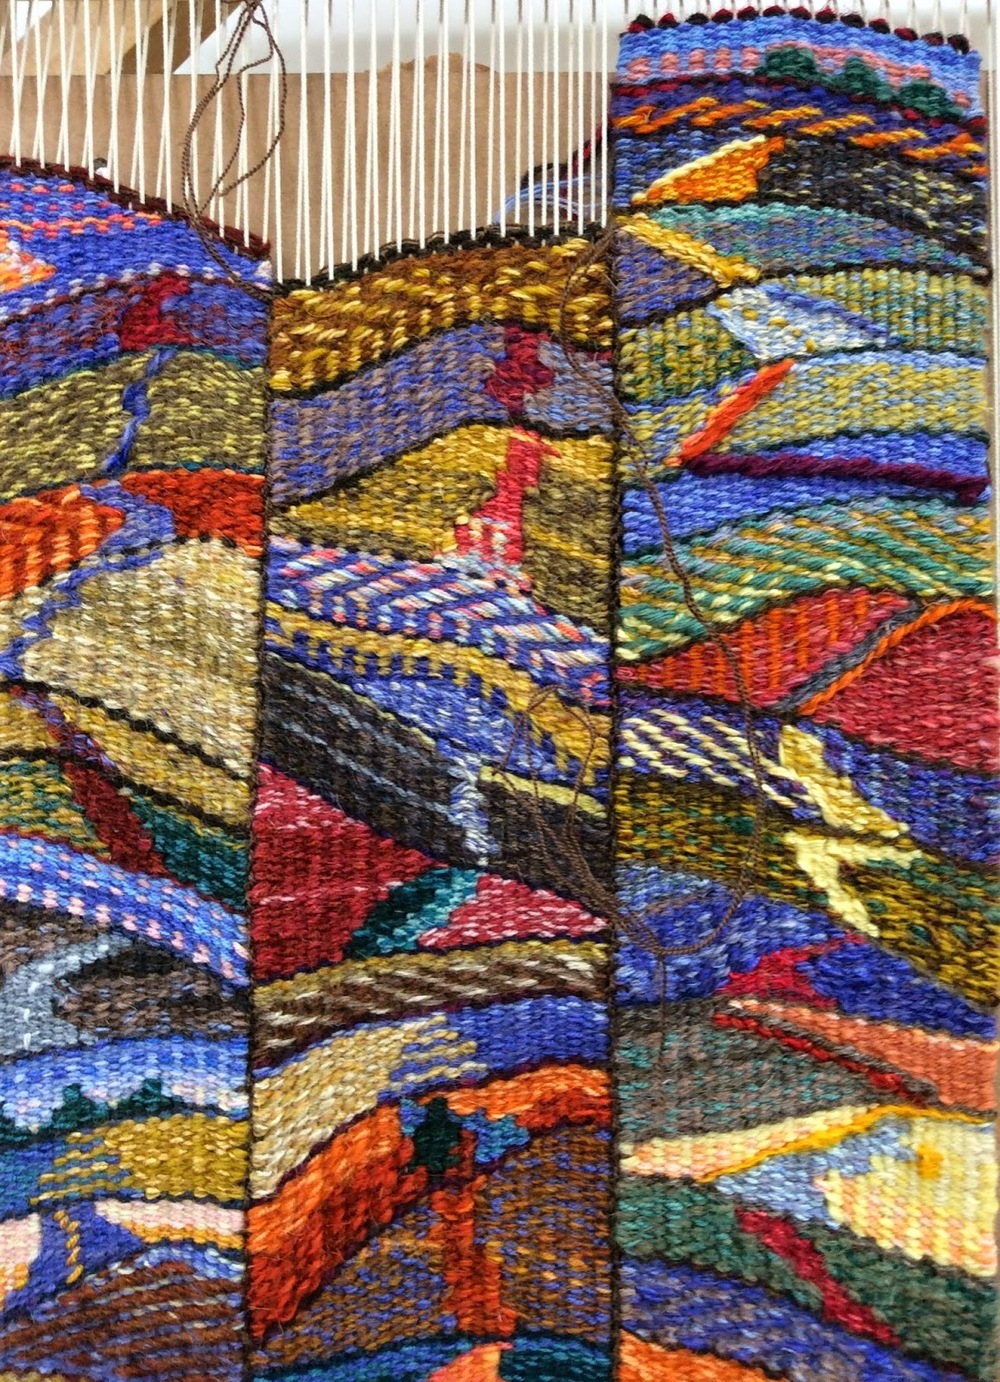
I think it is a tension problem. I am currently weaving pick by pick.  There are exactly the same number of rows of weft all the way across!!!  So what the heck is going on?  You can see the left side is packed way tighter, but that’s not the answer.  And it makes it look even more weird.  I need to sort out these issues or I think I won’t have the confidence to weave at all.  There is so much time invested to just throw something away.  I so much enjoy the process of weaving but I want some confidence that I won’t have to throw all my projects away.  I so hope you can help me.


The good thing is that I took one look at this photo and knew exactly what the problem is. She is weaving this on a two-foot Shannock and was thinking that this was caused by a warp tension problem so she tried to improve the tension on the left side of the piece. I can't feel the tension so I don't know if it is even, but that isn't the problem in this case.

The problem is WEFT tension, not warp tension. It is true that if you have a section of warp that is looser, you'll get a bubbling up of the weft. But that isn't what is happening here. One of the most important things in tapestry is to get the right amount of weft into your warp, and that is something that an experienced weaver learns to adjust constantly and mostly without thought.

Look at the warp spacing in the photo. The warps on the left where the fell line is rising are very close together compared to the rest of the piece. When warps get close together like this, there isn't anywhere for the weft to go because the space becomes so small, so it pushes up. Often people try putting less and less weft in in this case to try to fix the problem and that is the opposite of what has to happen. This piece is effectively now being woven eccentrically on the left side which only exacerbates the problem as you need even MORE weft in eccentric weaving to maintain warp spacing.

Consider what happens with the wefts in cross section:


In this diagram, the warp threads in cross section are shown with the large black circles. Each weft thread has to have enough slack to travel over and under each of those warp threads. The warp is under a lot of tension and when you don't put enough weft in to travel the extra distance, the only option is for the warp threads to move closer together.

When your warps start to get too close together, you need to put more weft in. Said another way, when your warps get crowded together, you need to increase the bubbling in that section. Make those bubbles bigger, not smaller. The extra weft you put in will start to push the warps apart and you won't have this problem of the rising fell line. (Notice that she is also having difficulty even covering the warp with the weft and has had to pack the left side of the piece very hard to keep the warp covered. This is a situation where you'll often see lice.)

Conversely, if you have areas where your warps are spreading apart, you need to put less weft in. Often in areas where there is a lot going on, the warps start to spread out. I will flatten my bubble or use no bubble at all to encourage the warps to come back together in this case. I also sew my slits as I go to help avoid this spreading warp problem.

Weft tension, or the amount of weft put into the warp with each pick, is something that has to be constantly adjusted. Watch those warps as you weave and then check to make sure your warp tension is even. If it is, you need to watch the amount of weft you're putting in carefully. You can change the areas in one pick that get more or less weft. Areas of warp spread can get much less weft (straight line), areas of warp crowding can get much more weft (bigger bubbles which increases amount of weft).

Here is a video that shows this bubbling problem.

The entire video is part of my new online tapestry techniques class. Visit www.rebeccamezoff.com/online-learning/ for more information. Part 3 of the class has a whole module on weft tension.

This student's piece was an extreme case where I advocated unweaving or filling in the low areas and then aggressively working to get those warps on the left to move apart. Do you have other ideas of how to fix this problem? Please leave your thoughts in the comments section below if you do!

For continued updates on my fiber adventures, subscribe to my newsletter (I'm going to a wool mill tomorrow! You can bet I'll have something to say about that!). The subscription box is in the upper right corner of this blog, or click HERE.

Resistance to possibility.


I was just reading a blog post by Tommye Scanlin which resonated with where I am right now. Beginning a new tapestry is hard. I have no problem whipping out a knitting pattern and grabbing the first yarn that might remotely work from my stash, but starting a tapestry is a whole different ball game. Somehow knitting just doesn't scream commitment like tapestry does.

As Tommye says, it is hard as rocks (of course she was weaving rocks so maybe she has a better position from which to say that). I like to think that other tapestry weavers have similar struggles with beginning and that this is somehow different from other art mediums. I suspect I am wrong about the other mediums. It is probably just as hard.

Tapestry somehow seems difficult because of the fear of beginning something I absolutely hate. It takes so long to weave a tapestry that the fear of making that mistake can be paralyzing. I often think about a design for months or even years before I even write something down. I fuss with it more, draw various iterations. Eventually I just have to start. Often what primes me is starting to dye. Sometimes I dye a bunch of sample colors in jars if I am really stuck. This gives me the opportunity to see multiple colors with less effort and time in case I make a real stinker.
But ultimately I have to get over the indecision and pick colors and start weaving.

And sometimes all that stuckness that I work out through dyeing means that I have this much yarn for a very small area of a tapestry.
At least I have choices.
...and as it turns out in this case, not enough yarn for the major color areas of the tapestry. Back to the dye pots.


As Tommye quoted,
"Begin at the beginning," the King said very gravely, "and go on till you come to the end: then stop."
(Lewis Carroll, Alice in Wonderland)


And this is my life...

Here is a wonderful video of Bhakti Ziek working on a commission for Community Hall at Whitman College, Princeton. This is not tapestry weaving (it is jaquard), but it is a wonderful tribute to fiber. She ends the video saying, "And this is my life."

I am not sure how it happened, but weaving is also, in part, my life.
When I design a weaving, I'm thinking about the weaving process from the beginning to the end. And so I'm not just doing a painting and then referencing it into a textile, I'm designing a textile.  
I think one of the tricks to being a weaver is staying involved. Just being able to be present with each step as it is.                                                                     --Bhakti Ziek


I am sending a newsletter tomorrow with a little bit about the changes in my life recently. If you aren't a subscriber, you can add your email by clicking HERE.

Online class sampler as well as some info on how to choose yarn.


I am so pleased by the great response I've had to my online beginning tapestry techniques class. I have had loads of good questions and that is great! If you're looking for more information about what we'll do in the class, I thought I'd post a couple photos of some of the things we'll be working on.

Here is a sampler that one of my class testers wove while working through the material in Part 1. There are a thousand permutations of this that you may come up with if you followed the instructions I give. This is but one path! (It is more than 2 feet long, but she did a lot of practicing. You may not reach this length yourself.)


At the end of Part 1, there are some ideas for weaving small pieces using the techniques we just learned. These come in the form of some suggested designs which you can modify or you can use the ones I provide to further practice your techniques. so you may end up weaving a great deal, or if you have a handle on the techniques, you may be done after you do something like the sampler below.

These samplers do not show the practice exercises you are encouraged to try at the end of the class. I want to hold off on showing photos of those so you can think about what you want to weave as you work. Of course when you get there, I'm happy to help if you get stuck with the design or colors!

And on to YARN!

Speaking of colors, the other issue is weft yarn. This can be a stumbling block when weaving tapestry in the United States. There are many suggested yarns in a handout you have access too immediately when you register for the class. I use Harrisville Highland yarn and I do recommend that for this class if you don't have anything already that you can use. You need at least three colors and I would recommend getting up to eight for a variety.

One way to start when you have to choose colors for a project is to think about what your favorite colors are. I'll use my favorite color, purple, as an example. I might choose one purple from the Harrisville Designs website (look for the knitting yarn section--you want to get Harrisville Highland in the skeins available there).

So say I choose the color Hyacinth as my primary color. 
Here is the Hyacinth:

I am going to choose a few analogous colors to go with it--or colors that are next to purple on the color wheel. So I also like the lighter blue/purple color Iris:
 Now I want to add a little variety. I am looking for a complimentary color which is one on the opposite side of the color wheel to add a little spice (I probably wouldn't use this color in large amounts in a finished piece, but in a sampler it could create some interesting contrasts). I am going to choose an orangish-red, Topaz:
Three colors is the bare minimum for doing this class. If I have a little more yarn budget, I would expand this selection somewhat. I would like to add a seagreen sort of color to mix with the blue and purple choices. I am going to choose Aegean:

Now I feel like I have a good blue and purple component. I want to add something very dark for an accent or to create a sort of background color that brighter colors will pop forward from. I am going to choose black for this (though I almost chose the deep red Teak color):


And I feel like these colors are pretty dark and want to add one more color to lighten it up. I am going to choose another purple, but a very light one, Lilac:


Since I love yarn, I could go on all day, but if my budget says stop here, these are the six I will choose.

You should start with whatever color you love the most, choose some colors that are close to it on the color wheel and then look at whether they are all really dark and make sure to include a light one or vice versa. And of course if you are adept at color use and want to do something totally different from what I'm suggesting here, go for it! This is only one idea if you're stuck with what yarn to buy. Another great way to choose colors is to google different fashion color palettes. They change with the season and there are always gorgeous ones. Matching those colors with the yarn available is another challenge, but it is a place to start.


I suggest at least 3 of the 3.5 ounce skeins of Harrisville Highland for the first part of the class. This probably won't be enough yarn to get you through all three parts if you are taking them all however. So you might want to expand that selection to 5 to 8 colors total. This will probably be enough yarn unless you weave a whole lot (like my tester did in the first sampler above).


The passing of time

Eventually if you talk to enough tapestry weavers, you'll hear something about tapestry and time. Tapestry is certainly a time-intensive medium. There is no way around the fact that we put our images together one strand of yarn at a time.

The American Tapestry Alliance has recently published a wonderful article written by Janette Meetze called The Tapestry Diary: It's about time. I think we can all thank Tommye Scanlin for starting this tapestry diary trend. Tommye is a tapestry weaver I admire a great deal for so many reasons. I'm not surprised she has started a movement.

The accumulation of time...
A Rumi poem, The Sunrise Ruby, as quoted by Tommye in the article

Submit to a daily practice.
Your loyalty to that
is a ring on the door.
Keep knocking and the joy inside
will eventually open a window
and look out to see who’s there.

A daily practice makes a large difference in a life. Adding a little bit every day, eventually we have made ourselves who we are. I think that happens in each moment. I applaud the weavers working on these diaries. They are really very cool!

The link is HERE!
Janette Meetze, detail of tapestry diary; Janette's blog is found at http://jmeetzestudiocommonthreads.blogspot.com/

This is what happens when you mix some acid wool dye, some water, and wool!

This week is dye week. I love the colors that come out of those dye pots. The whole process is either fun or a pain in the butt depending on how tired I am. But this week the weather is beautiful in Santa Fe and my skeins are swinging from their PVC pipes in the back yard drying. I feel sense of discovery that comes from putting a little powder and some acid in a pot and regulating the heat for a few hours and then pulling out amazing colors. I feel strong enough to lift pots with 2 to 15 gallons of water in them (okay, I might not be strong enough for 15 gallons... how about 10) and I am remembering to lift with my legs just like they told me in occupational therapy school.
I'm going to have to make a run to the studio for more yarn to dye today. I usually plan these huge dye runs because it kind of disrupts daily life around here to have yarn scouring in the bathtub, skeins spinning in the washer, and the garage full of bubbling pots. So I try to do it all at once and then back off for a few months. But apparently I didn't plan enough to fulfill my appetite because I have run out of the buckets of undyed yarn. Fortunately... you might remember these boxes?
There is plenty more yarn.